
If your bookkeeping or accounting firm is supporting you to upgrade to Wagepoint 2.0, you can complete the checklist below to ensure there is no delay in your payroll processing.
As part of the migration process, your bookkeeper or accountant will also support you to complete FINTRAC requirements. This involves providing information about your business that is required by Canadian legislation and ensures that your Wagepoint account is compliant.
Migration setup steps for clients
There are three steps to unlocking payroll in 2.0:
-
Create your login
This step must be completed before anything else can be completed. -
Add business details
This step may be completed by the partner, the Account owner, or the Authorized signatory. -
Sign business documents
This step can only be completed by the Authorized signatory or the Account owner if they are also the Authorized signatory.
Before you begin, identify your role. If you are unsure, ask your bookkeeping/accounting partner which steps you need to complete.
| Step | I am both the Account owner and the Authorized signatory | I am the Account owner (not the Authorized signatory) | I am the Authorized signatory (not Account owner) |
|---|---|---|---|
| Part 1: Create your login | Yes | Yes | Yes |
| Part 2: Add business details | As directed by your partner | As directed by your partner | As directed by your partner |
| Part 3: Sign documents | Yes | No | Yes |
Part 1: Create your Wagepoint 2.0 login details
1. Watch for an email with login credentials for 2.0. If you do not see this in your inbox, check your junk or spam folder.
2. In the email invitation, click Log in to Wagepoint 2.0.
3. Follow the prompts to create a password for your account. Your 1.0 login details, including 2FA, will remain separate.

4. Check the boxes to agree to the sign up terms, then click Continue.

5. Under "Do you agree to give (Partner) administrator access to your account?", select Yes, Partner can have administrator access to my account, then click Confirm.
Part 2: Add business details
In this step, you'll enter business details to create the required documents that are signed in the next step. While the partner, Account owner, or Authorized signatory can complete this part, only someone with Authorized signatory capabilities can actually sign the generated forms in Part 3.
Some details may have been filled out on your behalf; if so, simply skip to the next step.
1. Navigate to the Add business details page. If you completed Part 1, you are already here. If you skipped Part 1, click Add details in the navigation menu to begin.

2. Under Business information, select your account type:
Personal
For Personal accounts, the Personal type will automatically be filled out as Nanny or caregiver. No further information is required. You can skip to step 5.
Business
For Business accounts, further information is required.
Depending on business type, you will be asked to input different details, including:
-
Business type:
- Corporation
- Partnership
- Not-for-profit
- Sole Proprietor
- Incorporation type: For Corporations only, indicate whether the incorporation type is Federal or Provincial.
- Business number: This is a 9-digit identifier for your business, also used in your CRA account number.
- Industry subsector: Select the best fit category for your business.
- Main business activity: Select the best fit category for your business. The options available in this drop-down menu depend on your selection for Industry subsector.
- Business description (Optional): Enter a brief description of your business. You can use up to 256 characters.

3. For corporations, partnerships, and sole proprietors, enter any beneficial owners. A beneficial owner is someone who directly or indirectly owns 25% or more of the company.
- Indicate if any individual owns 25% or more of the company.

- If yes, click Add beneficial owner, enter the beneficial owner's details including their percentage of ownership, and click Save. Repeat for each beneficial owner.

4. For all business types, add information for all current directors of the company.
- Under Directors, click Add director.

- Enter the first and last name of the director, then click Save.

- Repeat for each director. Add information for all current directors of the company.
5. Under Authorized signatory profile, enter the information for your authorized signatory. Then, click Next.
- Select your authorized signatory from the drop-down menu. This will automatically populate with the name of the Account owner.
- If the Account owner is not the authorized signatory, use the drop-down menu to select Create administrator. The signing officer must be an administrator. If you have not yet created an account for the person who will be your Authorized signatory, you'll need to do that before you can make them your Signing officer.
- Enter the Authorized signatory's date of birth and home address. Please note that Authorized signatory's SIN is no longer required.

Part 3: Sign the business documents
The business documents must be signed by an individual with Authorized signatory permissions (either the Authorized signatory or the Account owner if they are also the Authorized signatory). The partner cannot complete this step.
1. Click Add details, from either the Overview page or the navigation bar.
2. Click E-sign to open Adobe Acrobat Sign.
- Only the Authorized signatory can click E-sign and sign the documents. If you are unable to click this button, then reach out to your partner to confirm that you are the Authorized signatory in the account.

3. Follow the prompts to fill in any missing information and sign the document.

4. Once the document is signed, return to Wagepoint and wait for the document to load. This may take a few minutes.
5. When the screen shows Required document signed, click Complete.
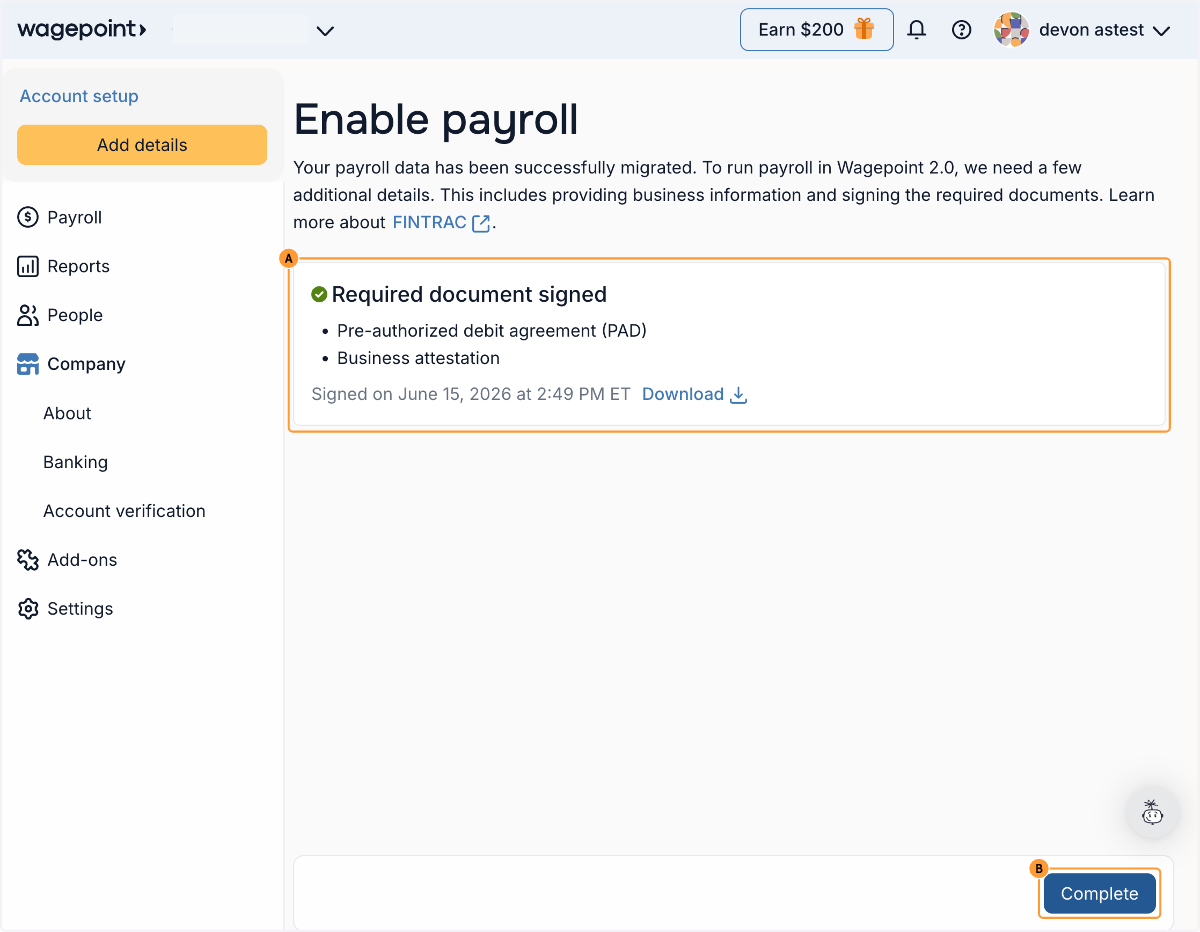
When all the steps above have been completed, payroll will be enabled in your Wagepoint 2.0 account. Please reach out to your partner for next steps or to confirm that they will take it from here.
FAQs: Migration setup for clients
-
To complete migration and FINTRAC, you will need to provide:
-
Business details
- Legal business name and Doing Business As (DBA), if applicable
- Company address
- Business type, industry subsector, and main business activity
- Incorporation type (if applicable)
-
Names, addresses, and ownership percentages for any beneficial owners
- A beneficial owner is any individual who ultimately owns or controls the business — typically anyone with 25% or more ownership, either directly or indirectly.
-
Names of all company directors
- A director is a person appointed to the company's board who is legally responsible for overseeing the business's operations and making high-level decisions. Directors may or may not be owners, but they hold formal governance authority within the company.
-
Authorized signatory details
- Name
- Phone number
- Government-issued photo ID (front and back)
- Home address
- Date of birth
- Email address
-
Business details
-
If your Wagepoint login doesn't work, ensure that you set up new credentials for your 2.0 account by following the steps in Part 1. Your 1.0 login details remain separate from the Wagepoint 2.0 app.
If you still encounter issues, go to payroll.wagepoint.com and try using the Forgot password option. If you receive no password reset email or it still does not work, reach out to your bookkeeping or accounting partner to ensure that you are correctly assigned as either the Account owner or the Authorized signatory, and that the correct email address was used.
- Reach out to your partner to ensure that you are correctly assigned as either the Account owner or the Authorized signatory, and that the correct email address was used.
-
This step can only be completed by the Authorized signatory or the Account owner (if they are also the Authorized signatory). These roles are assigned during the first part of the migration process when the migration-ready checklist is completed inside of your 1.0 account.
If you are able to sign into Wagepoint but not able to sign the PAD/BA form, then work with whoever initiated migration for your company to:
- Ensure you are correctly assigned as either the Account owner or the Authorized signatory.
- Ensure that the Review pay groups step in the migration guide has been completed. The Review pay groups step must be completed before you can proceed to Parts 2 and 3 above, and can only be completed by the Account owner or a Wagepoint accounting or bookkeeping partner.