
In this article, we'll cover
- how the migration works
- how to prepare for the migration
- where you can learn more about 2.0
- some common FAQs
How does the migration process work?
So, you've been invited to migrate to 2.0! What's next?
-
Prepare to upgrade by completing everything on your migration-ready checklist (more on that below!) and determining a good time for you to upgrade.
The best time to upgrade is shortly after all your payrolls are finalized. You’ll want to make sure you leave about 10 minutes to complete the upgrade and some time to get familiar with the new system before you process your next payroll. -
Click Upgrade.
This is our cue to bring over all the data to 2.0. It should take about 10 minutes to complete the upgrade and receive the email invitation to set up your 2.0 login and password. -
Complete the Enable payroll checklist.
Once you’re in, you’ll review your pay groups, enter your Business information and have your Authorized signatory e-sign the combined pre-authorized debit (PAD) agreement and Business attestation. -
Review and complete your data.
Your last step is to ensure all your migrated data is accurate and manually enter any missing data. Then you’ll be ready to run your first payroll!
Looking for links to migration support, live webinars, and resources all in one place? Check out the Migration hub.
Step one: Complete your migration-ready checklist
You'll find your personalized checklist in your 1.0 account under the Upgrade tab. Depending on your account set up and payroll status, you may have any or all of the items on the checklist assigned to you. Review the relevant steps below to get your account ready to upgrade.
- Administrators must have an email and enabled status to be moved over to your 2.0 account. You must enter an administrator's email as their username in order for them to be moved over. This email will be their username when they log into Wagepoint 2.0.
The existing report administrators will be moved over as Reports administrators in 2.0. The rest of your administrators will be added as Payroll administrators in your 2.0 account. - An account owner is in charge of the entire account's operation. This individual will be the owner of the Wagepoint account, but does not need to be the owner of the business itself. If there is no email assigned to the chosen administrator, you will be prompted to select the administrator's name and provide an email. If the relevant individual does have an email, you can select yourself or assign the role to an administrator in your company. If this individual is also the authorized signing officer for the company, you can indicate that there as well using the checkbox.
Note: The drop-down will only list administrators with enabled access. - The authorized signatory (also known as the authorized signing officer) is the person who can do banking and sign the company's cheques. You may or may not have an authorized signatory assigned in your 1.0 account, but this is required in 2.0. Similar to assigning an account owner, you must select an administrator to be the authorized signatory and provide an email address.
- If you have an unpaid NSF in 1.0, you cannot migrate to 2.0 yet. Please reach out to our friendly Customer Success team at support@wagepoint.com!
- You may need to approve the payroll or wait for your payroll to finalize and process.
- You have a payroll in progress. You'll need to finalize and process this payroll before you can upgrade.
- Please reach out to our friendly Customer Support team at support@wagepoint.com to help you with this.
- All employees must have a SIN and date of birth. If this item is on your checklist, it means that a SIN or date of birth is missing for at least one employee.
Is there anything else I should do before I migrate?
After you upgrade, you'll have the ability to create ROEs for your employees, but the rest of the app will only be available with view-only access. In addition to the steps above, we recommend that you also:
- We encourage you to download your 1.0 reports to an external location. We recommend that you do this at the time of migration.
- Once you've upgraded, you'll need to re-invite your employees and contractors to access their 2.0 employee portals. Don’t worry! Re-inviting is easy and can be done in bulk in just a few clicks. This guide to the Employee portal for employees and contractors can be shared with your team members and they will will retain access to their 1.0 portals until April 1, 2027. We recommend that all employees download their 1.0 reports when they get access to the 2.0 system.
-
When you migrate from Wagepoint 1.0 to 2.0, your year-to-date (YTD) totals move to the new platform, but the individual per-pay-period data remains in the 1.0 platform. Because Service Canada requires a detailed breakdown of each pay period to calculate benefits, you will need to issue ROEs from the 1.0 platform to "close out" that history.
Do I need to process ROEs before I migrate? No. You do not need to process ROEs in 1.0 before you click migrate. You will continue to have access to your 1.0 data after the migration to issue these ROEs as needed.When should I issue these ROEs? You have two options for issuing migration-related ROEs:
1. Proactively: You can issue ROEs for all active employees immediately after your last pay run in 1.0. This is the "cleanest" approach to ensure all historical data is filed with Service Canada. You can create an ROE in Wagepoint 1.0 without terminating the employee.2. As Needed: You can wait until an employee actually has an interruption of earnings (e.g., they leave the company). At that time, you must go back into the 1.0 platform to issue the "Part 1" ROE for the period prior to migration.
Check out this article for more details about ROEs and migration.
When is a good time for me to upgrade?
The best time to upgrade is shortly after all your payrolls are finalized. To avoid interruptions to your payroll, be sure to migrate before your migration deadline.
You’ll also want to make sure you leave about 10 minutes to complete the upgrade and then add in some time to get familiar with the new system before you process your next payroll. We recommend you plan ahead and set aside some time to familiarize yourself with the new system before you need to process your next payroll.
Step two: Click Upgrade
Go to the Upgrade tab, and click Upgrade now. This button will only be available if your upgrade-ready checklist is complete.
Confirm your upgrade in the confirmation window, and we will begin to move your data to 2.0. When this process is complete, you'll receive an email with a link to set up your 2.0 account.
I received a message that something went wrong. What do I do?
If migration fails for any reason, our team will receive a notification and look into your case as soon as possible. Once we understand next steps, a member of our customer support team will reach out to you.
If you've passed your migration deadline and migration failed, please reach out to us right away and we'll work together on a solution.
Step three: Complete the Enable payroll checklist
When you log into your Wagepoint 2.0 account, you'll be guided to your Enable payroll checklist. This page will show you the steps you need to take to complete the migration and enable payroll processing in 2.0. It also shows several recommendations for how to take advantage of Wagepoint 2.0's features, such as setting up statutory holiday pay and enabling two-step approval.
1. Sign into your new 2.0 account
The Account owner, Authorized signatory, and any administrators who were active in 1.0 and whose usernames were changed to emails will receive email invitations to create their 2.0 accounts.
Other administrators will not receive an invitation to set up their 2.0 portal by default. If you wish to add another administrator, an existing administrator can add and invite additional administrators from inside your 2.0 account.
Locate the welcome email in your inbox. If you do not see this in your inbox, check your junk or spam folder.
- Use the link in your email invitation to create a new password and log into your new 2.0 account.
2. Confirm your pay groups and pay group schedules
This step can only be completed by the Account owner and must be completed before moving on to the next step. The Account owner is selected as part of the migration-ready checklist in Step one: Complete your migration-ready checklist.
What to look for when reviewing your pay groups and pay group schedules:
-
Are all your pay groups listed under Overview > Pay groups?
Most pay groups are migrated automatically, but non-standard semi-monthly pay groups will need to be created. Please reach out to us at support@wagepoint.com if you have a non-standard semi-monthly pay group. -
Are the pay cycle dates accurate?
Review the pay cycle dates for each pay group. If the dates reflect the previous cycle but are otherwise correct, then this is not an issue and you can simply select the correct pay cycle dates on your first payroll run. If the dates are off-schedule, then reach out to support@wagepoint.com for assistance.
3. Add business details and sign documents to run payroll
In this step, you'll enter business details to generate documents and sign the required PAD and business attestation document. While the business details can be entered by any administrator, the documentation can only be signed by someone with Authorized signatory permissions.
1. From the Account setup page, click Add details.

2. Under Business information, select your account type:
Personal
For Personal accounts, the Personal type will automatically be filled out as Nanny or caregiver. No further information is required. You can skip to step 6.
Business
For Business accounts, further information is required.
Depending on business type, you will be asked to input different details, including:
-
Business type:
- Corporation
- Partnership
- Not-for-profit
- Sole Proprietor
- Incorporation type: For Corporations only, indicate whether the incorporation type is Federal or Provincial.
- Business number: This is a 9-digit identifier for your business, also used in your CRA account number.
- Industry subsector: Select the best fit category for your business.
- Main business activity: Select the best fit category for your business. The options available in this drop-down menu depend on your selection for Industry subsector.
- Business description (Optional): Enter a brief description of your business. You can use up to 256 characters.

3. For corporations, partnerships, and sole proprietors, enter any beneficial owners. A beneficial owner is someone who directly or indirectly owns 25% or more of the company.
- Indicate if any individual owns 25% or more of the company.

- If yes, click Add beneficial owner, enter the beneficial owner's details including their percentage owner, and click Save. Repeat for each beneficial owner.

4. For all business types, add information for all current directors of the company.
- Under Directors, click Add director.

- Enter the first and last name of the director, then click Save.

- Repeat for each director. Add information for all current directors of the company.
5. Under Authorized signatory profile, enter the information for your authorized signatory. Then, click Next.
- Select your authorized signatory from the drop-down menu. This will automatically populate with the name of the Account owner.
- If the Account owner is not the authorized signatory, use the drop-down menu to select Create administrator. The signing officer must be an administrator. If you have not yet created an account for the person who will be your Authorized signatory, you'll need to do that before you can make them your Signing officer.
- Enter the Authorized signatory's date of birth and home address. Please note that Authorized signatory's SIN is no longer required.

6. Click E-sign to open Adobe Acrobat Sign.
- Only the Authorized signatory can click E-sign and sign the documents. If you are unable to click this button, then reach out to the individual who migrated your account to confirm that you are the Authorized signatory.

7. Follow the prompts to fill in any missing information and sign the document.

8. Once the document is signed, return to Wagepoint and wait for the document to load. This may take a few minutes.
9. When the screen shows Required document signed, click Complete.
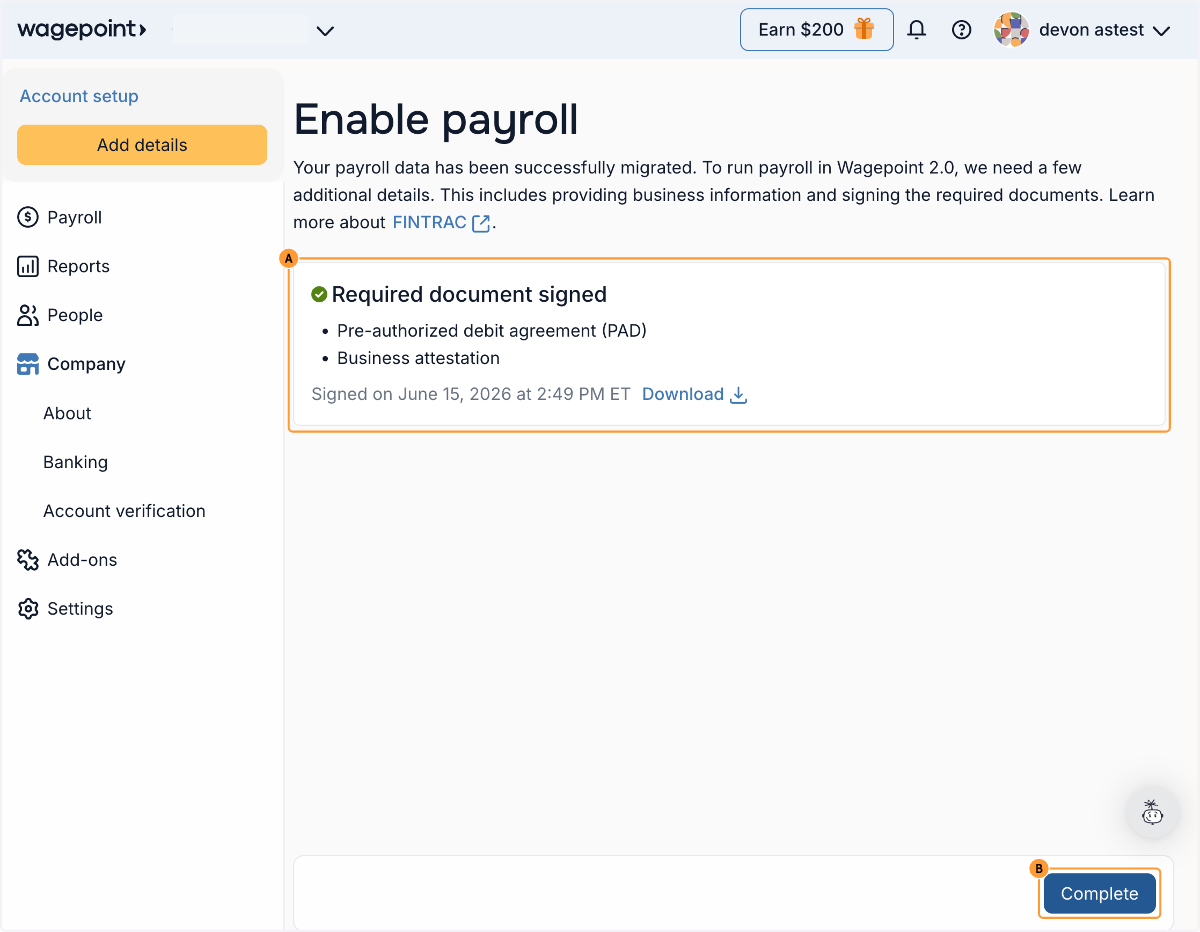
When all the steps above have been completed, payroll will be enabled in your Wagepoint 2.0 account.
If you'd like to fully complete your FINTRAC verification, follow the steps here to upload your Authorized signatory's photo ID and complete FINTRAC requirements. Any information you've entered as part of the migration flow so far will be saved and pre-filled for you -- you will not be required to enter business details or sign the form again.
Step four: Review and complete your data
The last step is to review your migrated data, and manually enter any non-migrated data such as custom codes. This may include:
- Reviewing your employee's YTD data to ensure that all codes and associated YTD amounts are accurate
- Creating and manually enter YTD data for custom codes
- Re-assigning a Workers' compensation rate
You'll find a full guide to reviewing and completing your data after migration here.
Unlock the full potential of Wagepoint 2.0!
You've successfully set up your 2.0 account, so what's next?
We've got some suggestions! These tasks aren't mandatory, but we highly recommend you complete whatever is applicable to you.
- Compare Year-to-date (YTD) data from 1.0 in the employee's Prior Payroll tab.
- Select a calculation method for statutory holidays.
- Reconnect your favourite integrations, like Time by Wagepoint, QuickBooks Online, and Xero.
- Invite your employees/contractors to join the employee portal in 2.0.
- Enable two-step approval for your payroll process.
- Enable Auto-run for any eligible pay groups after your first payroll is run.
Where can I learn more about features and workflows in 2.0?
Taking a course through the Wagepoint Academy is a great way to see the new product in action and learn how to use it. We’ve also enhanced our Knowledge Base (where you're reading this!) to include many helpful resources and guides.
You'll find release updates here. Click “follow” to receive updates when these articles are updated!
And if you've still got questions? You can connect with our friendly Canadian payroll specialists by sending an email to support@wagepoint.com. Another option is phone support at 1-877-757-2272, but we recommend emailing in your question for a quicker response.
How does pricing work in Wagepoint 2.0?
Great question! We have two plans: Solo and Unlimited. When you upgrade, we’ll automatically place you in a plan based on your number of pay groups. You can change your plan at any time. Check out our subscription and pricing guide here.
Other pricing questions
- The pricing model for 2.0 is based on a monthly subscription. This means that you’ll be charged only once a month according to your subscription plan. This is different from 1.0, where you’ve been charged every time you run a payroll.
We've tried our best to create an equitable pricing model without sacrificing on a superior product experience with Wagepoint 2.0. In fact, many of our existing customers will see considerable savings, especially when they factor in the unlimited off-cycle payrolls. We see this change to a subscription fee model as a necessary step to increase predictability and transparency around payroll costs for both of us. - Nope! Our new pricing model includes processing fees in your monthly subscription.
- There is no fee for the migration itself. However, part of the migration includes moving to a new monthly subscription plan.
FAQs: How to Upgrade
- Still the world’s friendliest payroll provider, but with a new look and enhanced features. Wagepoint 2.0 will elevate your payroll experience through streamlined processes, enhanced functionality and more user control. You’ll have access to the core 1.0 features you already know and love, like: direct deposit, tax remittances, year-end reporting, and ROEs. Plus, new upgrades like a payroll schedule, more administrator roles, effective dating and employee self-onboarding. You can find a comparison of 1.0 and 2.0 here!
- If you choose not to upgrade to Wagepoint 2.0, you can continue running payroll in your current account until your migration deadline. Once your deadline passes, you will no longer be able to run payroll in 1.0.
- Yes, if you want to continue using Wagepoint. All current customers will migrate to the new platform this year.
- We understand the appeal of a fresh start! If you'd prefer to create a brand new Wagepoint account, please reach out to our support team for further guidance. Keep in mind that you'll likely need to manually move some data over.
- If you're interested in migrating to Wagepoint 2.0 but have not yet been invited, reach out to our support team to discuss next steps. While we invite customers to migrate based on the features they use in 1.0, a migration specialist can review your specific situation.
- Visit this article to gain a comprehensive understanding of what data we will and will not move from your 1.0 account.
- The pay period data required for ROEs will not be carried over in the upgrade. However, you don't need to process ROEs in 1.0 before upgrading to 2.0. If an employee requires an ROE, you can still create ROEs in 1.0 after you upgrade.
- We encourage you to download your 1.0 reports to an external location.
- Please try again in a different browser. We are working to address this challenge.
- While you already signed a PAD as part of signing up for 1.0, 2.0 is an entirely separate platform and the way withdrawals work has changed. In 2.0, funds are withdrawn in three separate transactions (net pay, source deductions, and fees) rather than a single combined withdrawal, which requires a new authorization.
- You’ll be able to connect with our friendly Canadian payroll specialists by sending an email to support@wagepoint.com. Another option is phone support at 1-877-757-2272, but we recommend emailing in your question for a quicker response.
- Absolutely! Taking a course through the Wagepoint Academy is a great way to see the new product in action and learn how to use it. We’ve also enhanced our Knowledge Base to include many helpful resources and guides.
- Our QuickBooks Online integration and our Xero integration is available now, including the ability to manually or automatically sync your posting journal in both apps.